Monday, 10 October 2016

Testing out pose to pose with reference to a tutorial and using a pre created model and rig


I DO NOT OWN THE CHARACTER, MODEL OR RIG USED IN THIS ANIMATION
Animating pose to pose using a character created by someone else.

original Character created by Marvel 1963
Model and rig credit to ashwin_thegreat, Turbosquid, http://www.turbosquid.com/3d-models/free-ma-mode-cyclops-rig/1002988, Published February 5th 2016

     As promised, i used a rig, in this case one that i didn't create myself in order to practice pose to pose animation based on what i learned in the tutorial video here... https://www.youtube.com/watch?v=HPuU18wEf7s  by MegaBcoyle, published 2/2/16.

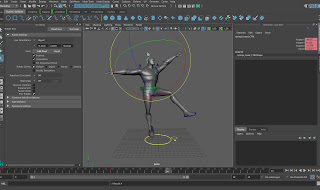
       This video used the idea of blocking and explained pose to pose animation and its uses. Having this in mind i used this model of cyclops from the X Men to create a fairly basic study into this method, a dance routine. This clip was five seconds long but has been slightly extended using premiere pro for the purpose of slowing the video down so the poses are clearer. There were a few slight issues in this animation which forced me to use step by step on a couple of frames to fix a deformation problem on the feet and there are some slight issues with movement on the feet due to this. Other than this though, i stuck to the routine of putting the poses on every 8th frame in order to time the poses better. The process seemed to work well as the poses can be clearly made out but work as a flowing movement as well. I found this to be an enjoyable experience and it was nice to look at all of the possibilities of movement thanks to the use of this rig. It was easy to see how pose to pose animation is less time consuming than step by step and the various technical reasons as to why many industry proffessionals use this animation method. I just used a playblast rather than a full render as well but i think that the animation is still clear. This study into the blocking process was helped by the tutorial video that I watched and it was a nice refresher on the topic. This has only been a quick animation as i am currently working on a storyboard for a larger project but i hope to revisit pose to pose in my animations in the future.

screenshots of the animation process.


Sunday, 9 October 2016

Pose to pose animation tutorial I found interesting and the technical workflow of pose to pose

https://www.youtube.com/watch?v=HPuU18wEf7s


       In this post I will write about the pros and cons of of this pose to pose animation tutorial. I think it worked very well at highlighting how animation can be created through pose to pose and its uses. Near the start of the video it mentions that it sets up a basis for building complexity in the characters. Splining is mentioned with posing highlighted as the main basis for the animation. Emotion is expressed through every pose. The pose tells us about the character.  It mentions blocking as a way of getting actions done. It goes through the process step by step. The man talks about basic keyframing and how poses help to highlight that. He times the frames nicely and takes time to zero out attributes. as he goes. It is fairly easy to follow. It is definitely a helpful tutorial for practicing pose to pose and goes on to talk about linear clamping and how to fix the keyframe timing through manipulation of the graph editor.
      If i was to criticise the tutorial though, i would say that the video seems rushed. Yes, the character has been animated and it explains blocking quite well but because of the tutor rushing, the animation is nowhere near as good as it could be. This can be overlooked though as the principles are there in a way that you can take his basics and use them as a base for further pose to pose animation.

    The technical workflow of pose to pose animation helps to create smoother flowing animations through elements such as blocking. They help animators to focus on key poses that affect the overall story and try to establish moods and emotions on the character without worrying about very subtle movements. It helps with timing and any issues when it comes to linking an animation to an audio track. Poses can be remade easily and the "extremes" can lead to an animator having a better understanding of when a pose it needed. Framing and expression can both be created in this method. Most 2D and 3D animations use this method in order to break down workflow for other members in the production team to follow more easily.    

In an upcoming post, i will use a rigged character to practice pose to pose animation using screenshots to practice the ideas presented in this tutorial.


video: MegaBcoyle, published 2/2/16

What makes a good storyboard?


      I think there are a few things that make a good storyboard. A storyboard should be a clear representation of the story as a whole with the visuals clearly highlighting the shots, angles and major plotpoints of the overall story. They should be simplistic and at the same time detailed enough to understand. It is a way of exploring ideas, knowing what works and what doesn't. It should get your ideas onto paper and help to create an idea with a few smaller notes that explain the scenes in a bit more detail. I think that it should solve any problems that you have and have a beginning, middle and end. The creator of a storyboard should effectively think of the best possible ideas for visual understanding and presentation of a shot on screen. It should experiment with close ups and various other shot possibilities. If they vary, it looks more interesting. I think that the best storyboards are created when the animator or artist looks at the storyboard idea carefully before committing to it.

     If someone that has never met you before sees the storyboard then a good storyboard should be understandable by them. Emotions should be present on a character's face so an audience knows what they are thinking. Maybe one should also add how much time has passed between the individual images in relation to the film. If there is audio or music then it should be mentioned in the notes. It can help to highlight what a director/animator needs in terms of props and poses and should be detailed with clever ideas.  

That is what I believe to be a good storyboard.


storyboard image reference:  , Ferzoco, Amy, storyboards: A close up, http://catmedia.com/storyboards-close-up/ ,   December 10, 2015


GOOGLE CALENDAR


Session 2 group task

https://drive.google.com/file/d/0B7n8vJWzDq8OajZRNnJER0FJZEk/view?usp=sharing


  This group project in class ran quite smoothly. We were forced to think about pose to pose animation within a short part of an animation.

We chose the picnic basket scene from "Mickey and the Seal" (1948) and looked at the various movements and emotions depicted in the scene. Overall the scene was fairly easy to evaluate with screenshots used to further explain our points The six questions were as follows


  1.          Which key poses show the character thinking
2.          Which poses present the best staging
3.          Which poses can be removed but still maintain the story?
4.          Does the animation work from a different angel?
5.          What are the character emotional beats?
6.          Comment on the style of timing


As a group work activity, it helped us once more to build teamwork and cooperation. From the point of view of animation, it developed our skills in critical evaluation.  

Above is the link to the word documents with the answers.


Wednesday, 5 October 2016

Animate a pet using primitives


              I found this to be a very difficult exercise at first. Due to the fact that I had never rigged a ball before, i struggled with this animation and so only created a fairly basic animation based on the fact that i was learning. My original story took inspiration from the fence animation in the demo folder with the character meant to be a cat. It is following the way that a cat moves across the top of a fence but as it is a ball, it is bouncing from post to post. It comes to a gap in the fence, the obstacle, and is hesitant to cross it before finally committing to the jump.

     The rigging process was a learning experience and i found that i am so much better at rigging a bipedial character than a ball (which should be simple). The skin on the tail decided to stop working half way through the animation too and so the tail appears rigid rather than the curve that had been there following the modelling and rigging.

    I feel that the parts of this that worked are fairly minimal. The timing needed to be much better and even after manipulating the graph editor for some time, it looked like a mess.

    It was from here that I decided to entirely change my idea to that of a fish swimming through obstacles in an aquarium. I watched some videos of how fish move and learned that the smaller fish have short graceful movements. The character isn't meant to be thinking much as it swims and the clip could be played on loop as the character probably would forget the experience almost immediately. It's motivation is as simple as that it intends to pass through these obstacles but treats without emotion, like a fish would.
     
     The animation worked well in the area of movement and look. The fish moves well and i believe that the camera angles that i used added to the overall fluidity of the animation with the fish tail moving nicely in different directions, almost as if the viewer was following the fish. I ended up doing more than just primitives as i extended the basic shape in order to form the tail. The eyes are primitive though. If i was to improve anything in this animation then it would be the jittery nature in some areas as it can be vaguely hard to follow due to my camera angle not always focusing on the fish. I had intended to enhance the belief of the environment thanks to the visor underwater lighting tools but an issue with the batch render eliminated this possibility, something that I intend to try and rectify in any future projects.


I used this video to look at the movements of various fish, I also looked at various images on pinterest which can be found on my "Visual and animated research for module" board. I found this to be very interesting and helpful as I was able to study the movement of the fish.

 https://uk.pinterest.com/josephlearoyd/visual-and-animated-research-for-module/


Villarreal, Oscar, Virtual aquarium, https://www.bing.com/videos/search?q=fish+moving+in+an+aquarium&&view=detail&mid=70682C58A87D62A24EC770682C58A87D62A24EC7&FORM=VRDGAR,
12 September 2012
https://www.bing.com/videos/search?q=fish+moving+in+an+aquarium&&view=detail&mid=70682C58A87D62A24EC770682C58A87D62A24EC7&FORM=VRDGAR

Friday, 30 September 2016

SECOND YEAR STARTS HERE   SECOND YEAR STARTS HERE

Anything prior to this date is from first year and SHOULD NOT be considered as part of second year marking.


Presentation in the first session on animated animals and the obstacles they face


https://drive.google.com/file/d/0B7n8vJWzDq8OVzJGcGZ2S3VRS28/view?usp=sharing


The group project that we did in the first session of the advanced character animation module was quite a stressful one. Eight of us where in a group together and had to complete seven tasks, forming them into a powerpoint presentation which we had to deliver at the end of the forty minute time slot. It was a task that let us work as part of a group, develop teamwork and critical thinking while also building on the information that we learned in first year. The sections that I was involved in were question 1, an outline of the video clip and the predicament that the character was in. In this case, it was Scrat from "Ice Age" who was struggling to bury a nut in the frozen ground. Following this, I wrote about the various animation principles that were present in the clip as requested in question 5. All of which can be found in the presentation, (link above).

As a group, we seemed to work well under the pressure and managed to create and deliver the presentation effectively. It was definitely a process that was difficult due to the time constraints but i enjoyed it all the same thanks to the group collaboration and the way that all of the members came together to create the final piece. It was a successful project and one that helped to develop understanding of the animation artform.